


一、Nightingale简介
夜莺( Nightingale )是一款国产开源、云原生监控系统,Nightingale 在 2020.3.20 发布 v1 版本,目前是 v5 版本,从这个版本开始,与 Prometheus、VictoriaMetrics、Grafana、Telegraf、Datadog 等生态做了协同集成,力争打造国内最好用的开源运维监控系统。出自 Open-Falcon 研发团队。夜莺监控项目,于 2022 年 5 月 11 日,捐赠予中国计算机学会开源发展委员会(CCF ODC),为 CCF ODC 成立后接受捐赠的首个开源项目。
Nightingale 可以接收各种采集器上报的监控数据,转存到时序库(可以支持Prometheus、M3DB、VictoriaMetrics、Thanos等),并提供告警规则、屏蔽规则、订阅规则的配置能力,提供监控数据的查看能力,提供告警自愈机制(告警触发之后自动回调某个webhook地址或者执行某个脚本),提供历史告警事件的存储管理、分组查看的能力。
二、Nightingale架构
产品架构

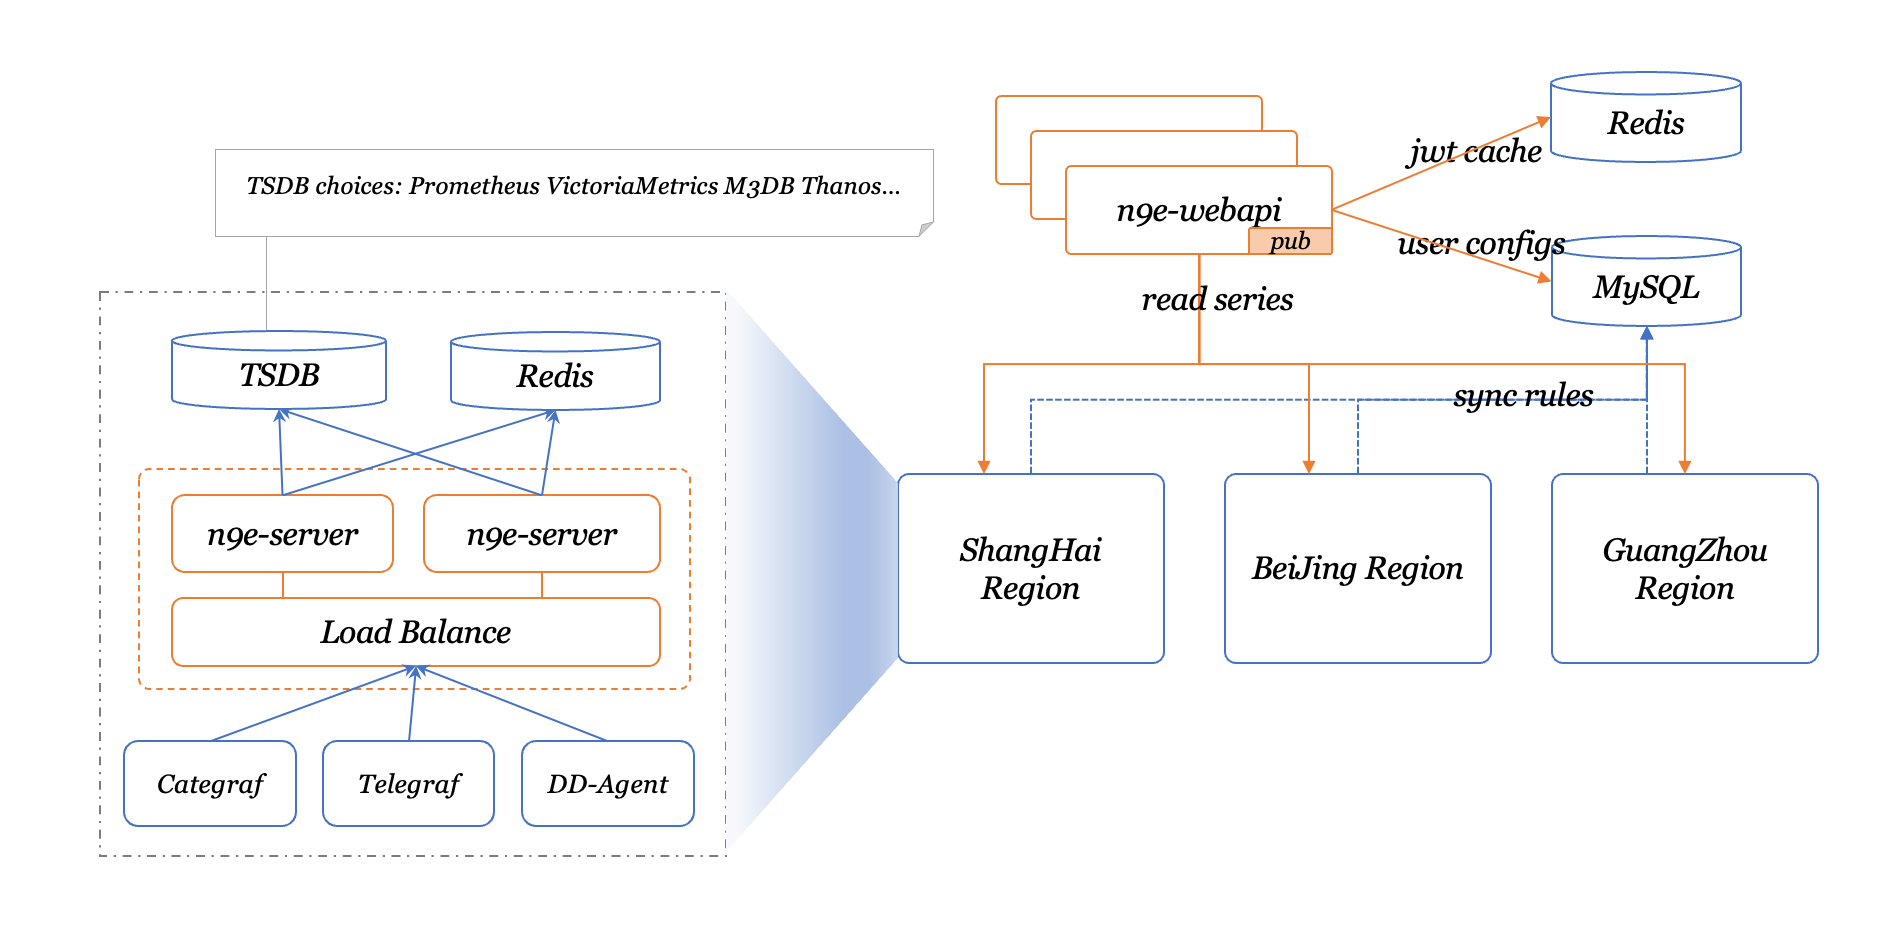
部署架构
三、安装部署
1.组件安装
1.1 mysql
yum -y install mariadb*
systemctl enable mariadb
systemctl restart mariadb
mysql -e "SET PASSWORD FOR 'root'@'localhost' = PASSWORD('1234');"
1.2 redis
# install redis
yum install -y redis
systemctl enable redis
systemctl restart redis
1.3 prometheus
# 安装 prometheus
mkdir -p /opt/prometheus
wget https://s3-gz01.didistatic.com/n9e-pub/prome/prometheus-2.28.0.linux-amd64.tar.gz -O prometheus-2.28.0.linux-amd64.tar.gz
tar xf prometheus-2.28.0.linux-amd64.tar.gz
cp -far prometheus-2.28.0.linux-amd64/*  /opt/prometheus/

# 配置为centos系统服务
cat <<EOF >/etc/systemd/system/prometheus.service
[Unit]
Description="prometheus"
Documentation=https://prometheus.io/
After=network.target

[Service]
Type=simple

ExecStart=/opt/prometheus/prometheus  --config.file=/opt/prometheus/prometheus.yml --storage.tsdb.path=/opt/prometheus/data --web.enable-lifecycle --enable-feature=remote-write-receiver --query.lookback-delta=2m

Restart=on-failure
SuccessExitStatus=0
LimitNOFILE=65536
StandardOutput=syslog
StandardError=syslog
SyslogIdentifier=prometheus


[Install]
WantedBy=multi-user.target
EOF

systemctl daemon-reload
systemctl enable prometheus
systemctl restart prometheus
systemctl status prometheus
2.n9e安装
2.1 安装
mkdir -p /opt/n9e && cd /opt/n9e

# 去 https://github.com/didi/nightingale/releases 找最新版本的包,文档里的包地址可能已经不是最新的了
tarball=n9e-5.8.0.tar.gz
urlpath=https://github.com/didi/nightingale/releases/download/v5.8.0/${tarball}
wget $urlpath || exit 1

tar zxvf ${tarball}

mysql -uroot -p1234 < docker/initsql/a-n9e.sql
# check logs
# check port
2.2 系统服务配置
2.2.1 n9eserver
cat <<EOF >/etc/systemd/system/n9e-server.service
[Unit]
Description="n9e-server"
After=network.target

[Service]
Type=simple

ExecStart=/opt/n9e/n9e server
WorkingDirectory=/opt/n9e/

Restart=on-failure
SuccessExitStatus=0
LimitNOFILE=65536
StandardOutput=syslog
StandardError=syslog
SyslogIdentifier=n9e-server


[Install]
WantedBy=multi-user.target
EOF

systemctl daemon-reload
systemctl enable n9e-server
systemctl restart n9e-server
systemctl status n9e-server
2.2.2 n9e-webapi
cat <<EOF >/etc/systemd/system/n9e-webapi.service
[Unit]
Description="n9e-webapi"
After=network.target

[Service]
Type=simple

ExecStart=/opt/n9e/n9e webapi
WorkingDirectory=/opt/n9e

Restart=on-failure
SuccessExitStatus=0
LimitNOFILE=65536
StandardOutput=syslog
StandardError=syslog
SyslogIdentifier=n9e-webapi


[Install]
WantedBy=multi-user.target
EOF

systemctl daemon-reload
systemctl enable n9e-webapi
systemctl restart n9e-webapi
systemctl status n9e-webapi
3.采集器-telegraf安装
3.1 linux系统安装
1.1 安装
cd /usr/local/src;
wget -S https://dl.influxdata.com/telegraf/releases/telegraf-1.22.4_linux_amd64.tar.gz
tar -zxvf telegraf-1.22.4_linux_amd64.tar.gz
cp telegraf /opt/
1.2 使用脚本启动
cat <<EOF > /opt/telegraf/start.sh
#!/bin/bash


case "$1" in
   "start")
     cd /opt/telegraf;
     nohup /opt/telegraf/telegraf --config telegraf.conf &
   ;;
   "shutdown")
     pid=$(ps aux|grep telegraf|grep -v 'grep'|awk '{print $2}')
     kill $pid
     kill $pid
     kill $pid
   ;;
   "restart")
     pid=$(ps aux|grep telegraf|grep -v 'grep'|awk '{print $2}')
     kill $pid
     kill $pid
     kill $pid

     sleep 2s

     cd /opt/telegraf;
     nohup /opt/telegraf/telegraf --config telegraf.conf &

   ;;
   *)
      echo "telegraf error"
      echo "$0 (start|shutdown|restart)"
   ;;
esac
EOF

sh start.sh restart
1.3 配置为系统服务
centos7可以配置为系统服务
cat <<EOF >/etc/systemd/system/telegraf.service
[Unit]
Description="telegraf"
After=network.target

[Service]
Type=simple

ExecStart=/opt/telegraf/telegraf --config telegraf.conf
WorkingDirectory=/opt/telegraf

SuccessExitStatus=0
LimitNOFILE=65536
StandardOutput=syslog
StandardError=syslog
SyslogIdentifier=telegraf
KillMode=process
KillSignal=SIGQUIT
TimeoutStopSec=5
Restart=always


[Install]
WantedBy=multi-user.target
EOF

systemctl daemon-reload
systemctl enable telegraf
systemctl restart telegraf
systemctl status telegraf
2.windows系统安装
夜莺n9e-v5使用采集器telegraf的windows版部署